 (cc) OAuth logo By Chris Messina, CC BY-SA 3.0
I'm starting with this post to write also my publications in English, although I'm not a native English speaker, but will do my best :) You can find the Spanish version here.
Usual part of web development projects is using external services to extend our applications functionality, or build our own microservices based applications providing an API to other applications to consume. In both cases, developers usually make use of tools like Postman to test all these API requests and validate them. All these services are normally protected by some kind of authentication method, which credentials needs to be added to Postman, and this can be a bit annoying to be done manually every single time. In this post, I'm showing how to automate the authorization process with Postman and Client Credentials authentication flow.
Authentication with Bearer Token
The use case I'm going to show is an API secured with Bearer token, using the Client Credentials authentication flow. In this case, instead of using the usual user/password, it will be the application who will authenticate on behalf of the user, using a client_id and client_secret, with which we will make a first request to obtain an access token. This token will be later used in any other API request, using the HTTPS header “Authorization: Bearer <token>”.
Postman Configuration
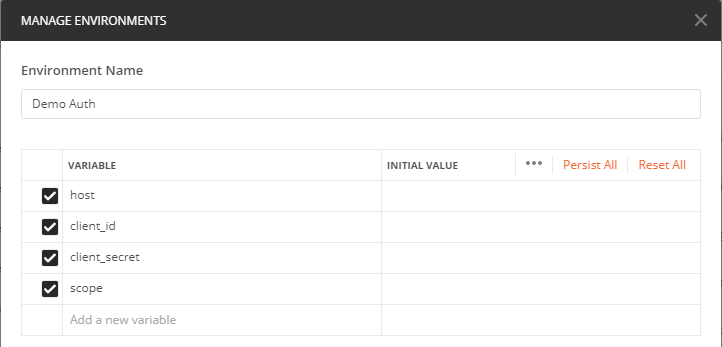
First of all, we should create an Environment, where credentials and the service host url will be stored. This way, whether we have different environments (DEV, QA, UAT, PROD, …), we could reuse the same requests and authentication as each environment will be using its own credentials.
![]()
In the new environment, we will create the following variables (with the right values for each environment):
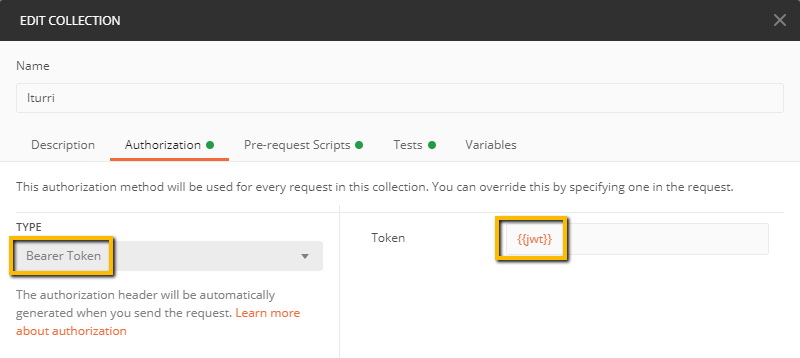
Next, we would edit the Collection we want to authenticte (tip: all the requests and folders underneath the collection will inherit the authentication settings by default from the root collection)
In “Authorization” tab, we would select the “Bearer Token” authorization type, and put the variable {{jwt}} at the Token field, which later our script will use to store the requested token value.
Next, just paste the following script into the “Pre-requests scripts” tab:
pm.variables.clear();

const moment = require('moment')

const getJWT = {
    url: pm.environment.get('host') + '/oauth2/v2.0/token',
    method: 'POST',
    header: {
        'Content-Type': 'application/x-www-form-urlencoded',
    },
    body: {
        mode: 'urlencoded',
        urlencoded: [
            {key: 'grant_type', value: 'client_credentials'},
            {key: 'scope', value: pm.environment.get('scope')},
            {key: 'client_id', value: pm.environment.get('client_id')},
            {key: 'client_secret', value: pm.environment.get('client_secret')}
        ]
    }
}

var getToken = true
if (!_.has(pm.environment.toObject(), 'AccessTokenExpiry')
    || !_.has(pm.environment.toObject(), 'jwt')
    || pm.environment.get('AccessTokenExpiry') <= moment().valueOf()) {
} else {
    getToken = false
}

if (getToken) {
    pm.sendRequest(getJWT, (err, res) => {
        if (err === null) {
            pm.environment.set('jwt', res.json().access_token)
            var expiryDate = moment().add(res.json().expires_in, 's').valueOf()
            pm.environment.set('AccessTokenExpiry', expiryDate)
        }
    })
}
Basically, the script sends a REST request to the url set at pm.environment.get('host') + '/oauth2/v2.0/token' (tip: you should edit this part of the url for your particular case, or just include it in the "host" variable), with the credentials stored in the current Environment, and then stores the token in the {{jwt}} variable, along with its expiration time.
On following requests, it will check whether there's already a token available, and not expired, to make use of it for the request, or will request it again if needed. Token content will be added automatically to any request headers, as it was defined in the Authorization tab before.
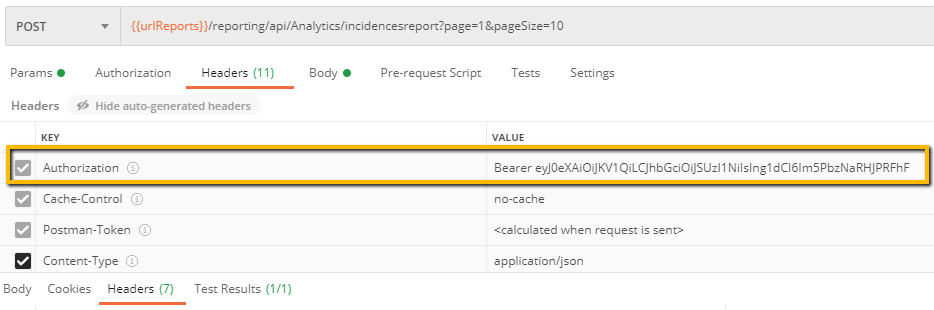
To check if it is working, in the next request send, we would verify the Headers tab of the Request that the Authorization header is added correctly, besides the request itself would have worked successfully:
This way, we wouldn't need to worry about requests authentication with an API secured with Client Credentials.