Blazor is the new development framework to develop SPA websites from Microsoft, and it is getting quite some attention lately. In this article, I'll do a simple demostration on how to make a request to an external API and displaying some data, using Refit library in an easy way.
Blazor allows to create website applications running C# on the client side, so effectively, most of the developers who consider ourselves mostly Backend devs, can now make the transition to become Full-Stack without the need of learning another client side framework like Angular or React. Also, there are already several UI control libraries for Blazor, some even free like Radzen. My last real-world application I developed myself using Blazor can be browsed at https://www.saboraemocion.com/
Making an introduction to Blazor is not the goal of this post, as there is already quite some good documentation on the topic to get you started pretty fast, and I recommend to start with the official docs and tutorials, at https://dotnet.microsoft.com/apps/aspnet/web-apps/blazor.
What actually I'll be doing is to use a Blazor sample project to introduce you to Refit, which is, quoting themselves "The automatic type-safe REST library for .NET Core, Xamarin and .NET", meaning it will automatically create an API client for us, starting from an Interface definition. Refit will take care of the low-level details: HTTP requests, authetication, headers, serialization, type conversion, etc. I will use Refit to create a small currency exchange conversion tool, with the data coming from the free API at https://api.exchangeratesapi.io/ (you can see the service details at https://exchangeratesapi.io/)
The source code can be found at https://github.com/sgisbert/blazor-currencyexchange
Initial configuration
For this simple example, we are creating a SPA application with Blazor Server and .Net 5. It can also be done using a model based on client and Blazor WebAssembly. Check the differences between both hosting models here: https://docs.microsoft.com/aspnet/core/blazor/hosting-models
To create the new application, we can make use of the Visual Studio wizard, or simply, as per the Blazor tutorial, run the following command from the console:
dotnet new blazorserver -o BlazorApp
And to check that everything is working, we change folder to the "BlazorApp" created, and run:
dotnet watch runthis will compile the application, run it, and will keep watching the source code, to build and restart again every time a code change is made. To stop it, we just need to hit Ctrl+C.
When it completes building, it will display that the app is listening to http://localhost:5001 and our default browser will pop up on that address, showing the scaffolded app we just created:

Adding the business logic
The goal on this example will be listing the currency exchange values available for the current date. For that, we need to call the endpoint at https://api.exchangeratesapi.io/latest, that will return a JSON object like this:
{"rates":{"CAD":1.5307,"HKD":9.4121,"ISK":155.6,"PHP":58.846,"DKK":7.4368,"HUF":358.5,"CZK":25.849,"AUD":1.5445,"RON":4.8758,"SEK":10.033,"IDR":17094.81,"INR":88.0145,"BRL":6.5633,"RUB":89.6089,"HRK":7.578,"JPY":127.81,"THB":36.386,"CHF":1.0851,"SGD":1.6059,"PLN":4.483,"BGN":1.9558,"TRY":8.447,"CNY":7.8318,"NOK":10.2095,"NZD":1.6642,"ZAR":17.7391,"USD":1.2139,"MXN":24.7094,"ILS":3.97,"GBP":0.86508,"KRW":1339.59,"MYR":4.9048},"base":"EUR","date":"2021-02-19"}Where we have all the different exchange prices against Euro for each currency, for the last published date.
The first thing I usually do is to create a new project on the solution to keep the business logic. This is not strictly necessary for this sample, but helps keeping up with best practices ;). To do so, I created a new .Net 5 library in the solution, called "Domain". In terms of "Domain Driven Development" (DDD) methodology, this will be our domain layer:
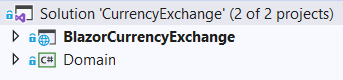
Again, full source code is on GitHub.
Once we got the new project, we will start creating the data model to work with. To generate the model in C#, we can use a tool like https://app.quicktype.io/, which will generate a complete C# class from the previous JSON data, optionally including helper methods to serialize and deserialize the data:

We will add the generated code to class Model/Rates.cs (we'll need to add a reference to the Nuget package Newtonsoft.Json):
namespace Domain.Model
{
    using System;
    using System.Collections.Generic;

    using System.Globalization;
    using Newtonsoft.Json;
    using Newtonsoft.Json.Converters;

    public partial class Rates
    {
        [JsonProperty("rates")]
        public Dictionary<string, double> RateList { get; set; }

        [JsonProperty("base")]
        public string Base { get; set; }

        [JsonProperty("date")]
        public DateTimeOffset Date { get; set; }
    }

    public partial class Rates
    {
        public static Rates FromJson(string json) => JsonConvert.DeserializeObject<Rates>(json, Converter.Settings);
    }

    public static class Serialize
    {
        public static string ToJson(this Rates self) => JsonConvert.SerializeObject(self, Converter.Settings);
    }

    internal static class Converter
    {
        public static readonly JsonSerializerSettings Settings = new JsonSerializerSettings
        {
            MetadataPropertyHandling = MetadataPropertyHandling.Ignore,
            DateParseHandling = DateParseHandling.None,
            Converters = {
                new IsoDateTimeConverter { DateTimeStyles = DateTimeStyles.AssumeUniversal }
            },
        };
    }
}
Next, we are using Refit to define the service that will make use of the API. For that, first thing is to include the nuget package Refit.HttpClientFactory in the project (Note: at the moment of writing this post, we are using Refit version 5.1.2. If you install version 6.x or higher it might not work straight away, because the default serializer engine has been changed from Newtonsoft.Json to System.Text.Json. I recommend to keep using 5.1.2 to follow the example without any issues, but have a look at the latest for new projects)
We add the following Interface to the Domain project Services/ICurrencyApi.cs:
using Domain.Model;
using Refit;
using System.Threading.Tasks;

namespace Domain.Services
{
    [Headers("Content-Type: application/json")]
    public interface ICurrencyApi
    {
        [Get("/latest")]
        Task<ApiResponse<Rates>> GetLatest();
    }
}
Where we are defining the request to the "latest" endpoint from the API, which will return an object of type "ApiResponse<Rates>", where ApiResponse will have the information of the request (http response code, errors, etc.) and the content of the response, which is our business model, Rates.
Next, we are adding the service that will make use of the Refit service, Services/ICurrencyService.cs:
using Domain.Model;
using Refit;
using System.Threading.Tasks;

namespace Domain.Services
{
    public interface ICurrencyService
    {
        Task<ApiResponse<Rates>> GetLatest();
    }
}
and its implementation, Services/CurrencyService.cs:
using Domain.Model;
using Refit;
using System.Threading.Tasks;

namespace Domain.Services
{
    public class CurrencyService : ICurrencyService
    {
        private readonly ICurrencyApi _api;

        public CurrencyService(ICurrencyApi api)
        {
            _api = api;
        }

        public async Task<ApiResponse<Rates>> GetLatest()
        {
            return await _api.GetLatest();
        }
    }
}
Finally, we will add a class to our library in charge of initializing the services we just created, so that netcore dependency injection is able to instantiate them correctly, DomainStartup.cs:
using Domain.Services;
using Microsoft.Extensions.DependencyInjection;
using Refit;
using System;

namespace Domain
{
    public static class DomainStartup
    {
        public static void InitDomain(this IServiceCollection services)
        {
            services.AddScoped<ICurrencyService, CurrencyService>();

            services.AddRefitClient<ICurrencyApi>()
                    .ConfigureHttpClient(c => c.BaseAddress = new Uri("https://api.exchangeratesapi.io/"))
                    .SetHandlerLifetime(TimeSpan.FromMinutes(2));
        }
    }
}
In this case, we initialize our CurrencyService, and make use of method AddRefitClient to tell Refit the initialization values for the API, and the base URL of the service.
Using the service in the Blazor application
Until now, we have not modified anything on the Blazor application we created at the beginning. At this point, we will add some code to show the list of currencies and their exchange rate.
First step will be modifying the Startup.cs to initialize the services from the Domain:
using Domain;

...

public void ConfigureServices(IServiceCollection services)
{
    services.AddRazorPages();
    services.AddServerSideBlazor();
    services.AddSingleton<WeatherForecastService>();

    services.InitDomain();
}
Next, we create a new Razor component to host the page with the list of currencies, Pages/Currency.razor:
@page "/currency"

@using Domain.Services
@using Domain.Model
@inject ICurrencyApi CurrencyService


<h1>Currency converter</h1>

@if (rates == null)
{
    <p><em>Loading...</em></p>
    <p>@error</p>
}
else
{
    <h3>1 @rates.Base is worth as of @rates.Date.ToString("d"):</h3>
    <table class="table">
        <thead>
            <tr>
                <th>Currency</th>
                <th>Rate</th>
            </tr>
        </thead>
        <tbody>
            @foreach (var rate in rates.RateList)
            {
                <tr>
                    <td>@rate.Key</td>
                    <td>@rate.Value</td>
                </tr>
            }
        </tbody>
    </table>
}

@code {
    private Rates rates;
    private string error;

    protected override async Task OnInitializedAsync()
    {
        var response = await CurrencyService.GetLatest();
        if (response.IsSuccessStatusCode)
        {
            rates = response.Content;
        }
        else
            error = response.Error.Content;
    }
}
In this page, we first inject our domain service:
@inject ICurrencyApi CurrencyService
During the component initialization, OnInitializedAsync(), we call the service to get the data:
var response = await CurrencyService.GetLatest();
If the request is succesful, we initialize the local variable rates, which will be the one used to display the data on screen:
rates = response.Content;
Finally, let's add a link in the menu to our newly created page, modifying Shared/NavMenu.razor:
<li class="nav-item px-3">
    <NavLink class="nav-link" href="currency">
        <span class="oi oi-list-rich" aria-hidden="true"></span> Currency
    </NavLink>
</li>
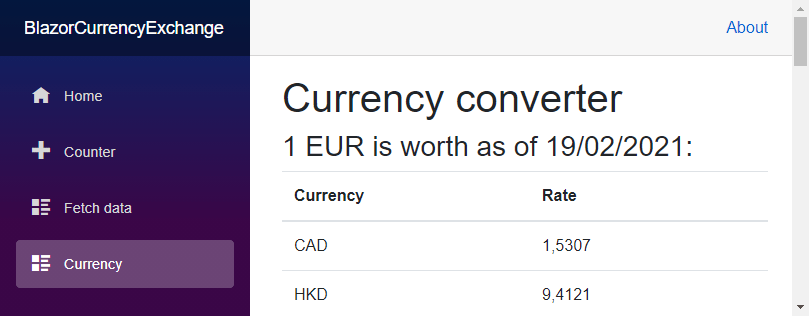
If everything goes fine, and we still have the app running with "dotnet watch run", we can go back to the browser and we will see the new option in the menu. If not, we just launch the application and wait for the browser to run. Clicking on the menu, we should see the list of currencies exchange rates at the current date:

Summary
- Blazor is becoming a very interesting framework to develop SPA and dynamic web applications, same style as React, Angular, etc. specially for developers specialized on backend and C#.
- Refit is a library to dynamically create REST APIs clients with minimum effort, but very powerful at the same time.
In the following posts, I will keep showing some features from Blazor and RefitEn próximos posts seguiré mostrando algunas funcionalidades de Blazor y Refit, going deeper a bit more on this sample application to calculate currency exchange rates.