You can find the Spanish version of this post here.
Postman is a useful tool to test API requests, whether we are developing our own APIs, as well as we are using a third party provider APIs, so that we can check all the data received on each request. In this post, I will explain how to include validation tests along with each request, to check the calls are succesful and also that the json data received meets the expected JSON schema agreed.
This post is part of a series about Postman, started with Automatic API authentication.
Check request result
The first and simpler test that we can include is to validate the request has succeded, and we got the Response 200 OK, or any other response code we may be expecting. To do so, the easiest way is to include the test at the Collection level, so that all the requests underneath will inherit this validation.
So you can edit the Collection, select the "Tests" tab, and include the following script:
pm.test("Status code is OK", function () {
    pm.expect(pm.response.code).to.be.oneOf([200, 201, 204, 207])
});
You can include any other response codes you might be expecting from your requests as well.
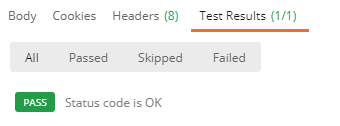
Once set up, on any request execution, you should see the test result in the response "Tests" tab:
Response JSON schema validation
Postman scripting is quite a powerful asset, so you can go beyond a simple response code validation and include more complex validations, like checking that the response JSON meets a determined schema.
In order to execute such validation, back to the "Tests" tab in the Collection to include the following script, right after the previous script we added in the previous step:
try
{
    var schema = pm.variables.get("schema");

    if(schema)
    {
        const jsonData = pm.response.json();
        if(jsonData)
        {
            //const dateTimeRegex = new RegExp('^(-?(?:[1-9][0-9]*)?[0-9]{4})-(1[0-2]|0[1-9])-(3[01]|0[1-9]|[12][0-9])T(2[0-3]|[01][0-9]):([0-5][0-9]):([0-5][0-9])(.[0-9]+)?$');
            var Ajv = require('ajv'),
            ajv = new Ajv({logger: console, allErrors: true});
            //ajv.addFormat('date-time', {
            //    validate: (dateTimeString) => dateTimeRegex.test(dateTimeString)
            //});

            pm.test('Schema is valid', function() {
                var validate = ajv.validate(schema, jsonData);
                console.log(ajv.errors);
                pm.expect(validate, JSON.stringify(ajv.errors)).to.be.true;
            });
        }
    }
}
catch(e){
    console.log(e);
}
This script will get the schema from the "schema" variable, that we'll set up later, and will validate the response content against it, using the "Ajv" library. As an add-on, I left commented out how to include a specific date formatting validation rule, in cases where you might need custom formats for some data types.
Next step will be to get the schema itself that we are expecting the response to return. If you have access to the API service details, with tools like Apiary or Swagger, you can get the schema details from them. If not, but you have a valid JSON object, you can use online tools like Quicktype to generate your own schema. In the following screenshot, you can see the schema generated with a JSON from the Zendesk API:
_637470018453262659.png)
Once you got the schema, back to Postman, select the request you want to be validated, and edit the "Pre-request Script" tab, where you should add the following script (using the schema from the step before):
var schema = {
    "$schema": "http://json-schema.org/draft-06/schema#",
    "$ref": "#/definitions/ZendeskJobResult",
    "definitions": {
        "ZendeskJobResult": {
            "type": "object",
            "additionalProperties": false,
            "properties": {
                "action": { "type": "string" },
                "id": { "type": "integer" },
                "status": { "type": "string" },
                "success": { "type": "boolean" }
            },
            "required": ["action", "id", "status", "success" ],
            "title": "ZendeskJobResult"
        }
    }
};

pm.variables.set("schema", schema);
By default, it is possible that all the properties may be included in the "required" array, so you will need to manually check if that fits your needs. You are adding the schema to a local variable, and then storing it as a runtime variable.
You need to do this process for every single request you want to validate, as normally the response data schema will be different on every request, but this is the only step you need to do, as the validation script itself is shared across the Collection.
It works in the following way:
- Before the request is sent, the "Pre-request Script" is executed and the "schema" variable is stored.
- After the request is executed, the script in Collection "Tests" tab is executed, and will use the variable set up by the request to validate the response data.
As a result, you should see in the response Tests tab a second test included:

In the event that the data is not valid, you should see the wrong property and the reason why the schema was not met:
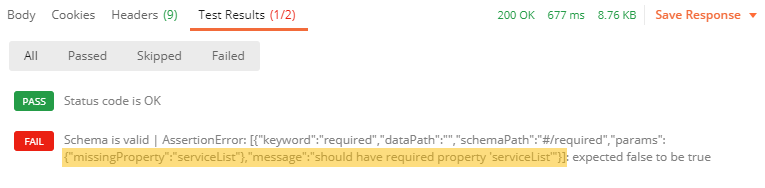
In this case, you can see the "serviceList" property is missing, but it was defined as "required".
Tests execution in batches
Once validation tests are defined, we can make use of another tool included with Postman to run a batch execution of all or a selected subset of requests defined in a Collection. To do so, you can use Runner:

You should select the Collection to execute, or the folder, or even the specific requests you want to include in the bath; then the Environment used, and the number of executions, the delay between each request, and some other additional settings. Runner will execute all the requests for us, and will present us with a report on finalization:

This way, we can easily run all our requests and check that everything is still fine after a deployment into Production, for example.